This tutorial borrows heavily from Sridhar Katakam’s tutorial on creating a filterable portfolio in the Centric Pro theme, so props to him for doing most of the work!
I worked on an interesting project recently and thought I’d share in case it helps someone else. A partner’s client wanted to display videos in a grid format that (1) could be filtered by category and (2) opened in a lightbox when visitors clicked on the featured image.
Want to see how it works before you learn how to do it?
Filterable Video CPT with Lightbox – Instructions
Part One: Prepare Your Site and Theme
Step One: Add the video custom post type to your Genesis site.
Many tutorials will tell you to add code to your theme’s functions.php for this, but I’m a fan of custom functionality plugins. Using a plugin means you won’t lose your video CPT if you change themes later (though you will need to redo the template, CSS, etc.).
I’ve written a simple plugin for the video custom post type, which you can download here. Once downloaded, you can install and activate it in your WordPress dashboard just like any other plugin.
IMPORTANT! Once you’ve activated the plugin, you’ll need to go to Settings > Permalinks and click the Save button. Any time you add or remove a custom post type, you’ll need to do this to avoid 404 errors.
Step Two: Install additional plugins.
I used a couple of repo plugins to make this happen:
- Advanced Custom Fields (I used the Pro version, but the free version will work just fine)
- WP Video Lightbox – You can opt to use another plugin if you’d like, but the archive template for this tutorial was written with WP Video Lightbox in mind.
- Regenerate Thumbnails – You’ll need this to regenerate image thumbnails after we’ve made the necessary changes to your Genesis child theme. Once you’ve regenerated thumbnails (I’ll let you know when we’re ready to do that part), this plugin can be removed.
Step Three: Add the necessary JS files.
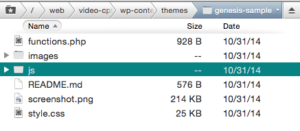
Access your site’s files via FTP and navigate to your child theme’s folder in /wp-content/themes/. Create a new folder within your child folder called /js/.
Inside the /js/ folder, first upload jquery.isotope.min.js.
Next, create a new file called isotope_init.js and use the following:
Step Four: Add necessary functions.
We need to add two small adjustments to your child theme’s functions.php. First, we need to add a new image size for the featured image – you may want to alter this size depending on your preferences. Second, we are going to set the posts per page to an unlimited amount, so that all your videos will display on a single archive page.
Add the following to the bottom of functions.php:
Step Five: Add the archive template.
This template creates an archive for the video CPT with a full width layout and mobile responsive grid. The template also adds the appropriate link rel so your videos will open in a lightbox. This should be saved as archive-videos.php in your child theme’s folder.
Step Six: Regenerate Thumbnails.
Okay, now it’s time to regenerate thumbnails. Go to Tools > Regen. Thumbnails in your WordPress dashboard to run the tool. If you have a lot of existing images, this might take awhile. You can continue in another browser tab while thumbnails are being regenerated.
Step Seven: Add CSS.
Now that all the code is in place, we need to add some CSS to make the video grid show up nicely. Again, props to Sridhar Katakam since most of this CSS is his:
Part Two: Setting Up Advanced Custom Fields
Now that the worst part is out of the way, it’s time to use Advanced Custom Fields to make our lives a lot easier.
Your video posts need four pieces of information: a title, a featured image, a URL to a video, and a category (or a Type in this case, if you used my Video CPT plugin).
We can use ACF to provide a field for the video’s URL, as well as removing the post editor box since we don’t need it. Here’s how it works.
Step One: Add a Field Group.
In your dashboard, go to Custom Fields > Custom Fields (catchy, huh?) and click the Add New button at the top to add a new field group.
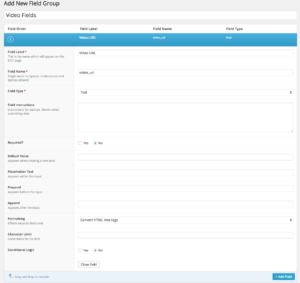
Name your field group Video Fields, then click the button to add a field to the group.
For Field Label, use Video URL. When you tab to the next area, the field name should populate as video_url automatically. IMPORTANT: Be sure your field name is video_url as this is called in the video archive template. If you give the field another name, the template won’t work.
If you are using ACF Pro, choose the URL field type, or if you’re using the free version of ACF, choose Text. (Click the image below to view larger.)
Step Two: Choose the Location.
The next box in the ACF settings gives you some options for when this field group should display. Your settings should read “Show this field group if Post Type is equal to videos.”
Step Three: Remove unneeded editor screen options.
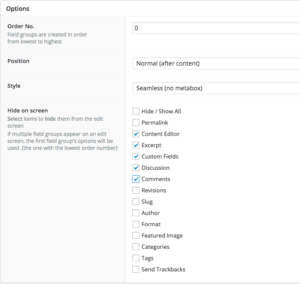
The Options section within ACF allows you to remove unnecessary sections from the video CPT editor page. Check the boxes to hide the Content Editor, Excerpt, Custom Fields, Discussion, and Comments.
Click the Publish button to publish your field group. Now we’re all finished with Advanced Custom Fields and we’re ready to add videos!
Part 3: Add Videos
Step One: Add a new Video.
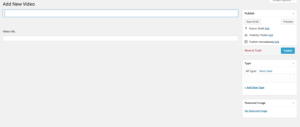
Go to Videos > Add New in your dashboard. You should see a rather naked-looking editor page like this (yours may have some additional metaboxes depending on what other plugins you’re using):
Add a title, featured image, and the URL to your video. On the right side of the screen, don’t forget to choose a Type – these are the categories that will be used for filtering.
Step Two: Go check it out!
Now you can visit yourdomain.com/videos/ to view your CPT archive page. You should see your featured image with the video title underneath, and clicking the featured image will open your video in a responsive lightbox. How cool is that?


Hi, this tutorial is really great and I feel it would suite my needs for a portfolio…however, I have a few questions:
1) Does this still work with only images? Should I clean up the code a bit if so?
2) Is there capability to have next/prev function while in lighbox mode?
Hi Megan,
If you want images only, I’d suggest the original tutorial here. Or, since that site is members only, there’s a similar tutorial here and one that specifically includes a lightbox here. The great thing about Genesis is never lacking for great tutorials! 🙂
Verry nice tutorial. this article I find via Google Search. thanks 🙂
You’re very welcome! I’m glad you found it useful. 🙂
This is an ancient article,
so comments are now closed.